|
Size: 6104
Comment:
|
Size: 9374
Comment:
|
| Deletions are marked like this. | Additions are marked like this. |
| Line 22: | Line 22: |
| The main window shows a list of open micrographs and how many helices you have boxed in each one. (Actually, only one micrograph is loaded in memory at a time, but this allows for quick switching between particles.) Any micrographs you specified after the "--gui" option will be listed. | The main window shows a list of open micrographs and how many helices you have boxed in each one. (Actually, only one micrograph is loaded in memory at a time, but this allows for quick switching between micrographs.) Any micrographs you specified after the "--gui" option will be listed. |
| Line 40: | Line 40: |
| . 1. Coordinates to text file using the EMAN1 file format, but with a default *.txt file extension. | 1. Coordinates to text file using the EMAN1 file format, but with a default *.txt file extension. |
| Line 49: | Line 49: |
| . 2. Helix image data to image files | 1. Helix image data to image files |
| Line 51: | Line 51: |
| B. Write Particles checkbox: | A. Write Particles checkbox: |
| Line 53: | Line 53: |
| . 1. Overlap: Distance in pixels that two adjacent particles overlap along the line connecting their centroids. Default: 90% of particle length | 1. Overlap: Distance in pixels that two adjacent particles overlap along the line connecting their centroids. Default: 90% of particle length |
| Line 55: | Line 55: |
| . 2. Length: Distance between the centroids of two adjacent particles. Default: same as helix width | 1. Length: Distance between the centroids of two adjacent particles. Default: same as helix width |
| Line 57: | Line 57: |
| . 3. Width: Width of particles in pixels. Default: same as helix width | 1. Width: Width of particles in pixels. Default: same as helix width |
| Line 59: | Line 59: |
| . 4. Write particle coordinates: For each helix, save the coordinates for the midpoint of each particle in that helix. | 1. Write particle coordinates: For each helix, save the coordinates for the midpoint of each particle in that helix. |
| Line 61: | Line 61: |
| . 5. Write Particle images: Save the image data for each particle in each helix. All the particles in a helix will go in a stack file if the file type supports stacks. | 1. Write Particle images: Save the image data for each particle in each helix. All the particles in a helix will go in a stack file if the file type supports stacks. |
| Line 63: | Line 63: |
| . a. Normalize edge-mean: Apply the "normalize.edgemean" processor to each particle before saving. | a. Normalize edge-mean: Apply the "normalize.edgemean" processor to each particle before saving. |
| Line 65: | Line 65: |
| . b. Use unrotated particle: The particles will squares with horizontal and vertical sides. The length of a side of the square will be the maximum of the chosen particle width and particle height. The distance between the centroids of two adjacent particles will still equal the particle length, and the overlap will be measured along that line joining their midpoints. | a. Rotation: i. Bilinear: Use bilinear rotation (default) i. Gridding: Use gridding rotation. Forces particles to be square. i. No rotation: The particles are squares with horizontal and vertical sides. The length of a side of the square will be the maximum of the chosen particle width and particle height. The distance between the centroids of two adjacent particles will still equal the particle length, and the overlap will be measured along that line joining their midpoints. a. Image Stacks i. Single Image Stack: Stores all particles from the micrograph in a single image stack. Places the particles for an individual helix next to each other in the stack. i. Image stack per helix: For each helix in the micrograph, stores all particles in a stack. Helix numbers are inserted into the file names. i. File for each particle: Each particle is saved in its own image file. Helix numbers and particle numbers are inserted into file names. |
| Line 67: | Line 74: |
| . | {{attachment:e2helixboxer_diagram.png}} {{attachment:e2helixboxer_unrotated_ptcl_diagram.png}} |
| Line 74: | Line 82: |
| {{{ e2helixboxer.py <options (not --gui)> <micrograph> }}} | {{{ $ e2helixboxer.py <options (not --gui)> <micrograph> }}} |
| Line 77: | Line 87: |
| --db-add-hcoords=DB_ADD_HCOORDS: Adds helix coordinates to the database from the specified file (in EMAN1 *.box format) | |
| Line 79: | Line 88: |
| If you have coordinates for the helices that are not saved in the EMAN2 embedded database, perhaps because you did the boxing in another program, you must first import them to the embedded database before you can use e2helixboxer to generate particle sets. --db-add-hcoords=DB_ADD_HCOORDS:: Adds helix coordinates to the database from the specified file (in EMAN1 *.box format) |
|
| Line 85: | Line 97: |
| --db-set-hcoords=DB_SET_HCOORDS: Replaces the helix coordinates in the database with the coordinates from the specified file (in EMAN1 *.box format) | --db-set-hcoords=DB_SET_HCOORDS:: Replaces the helix coordinates in the database with the coordinates from the specified file (in EMAN1 *.box format) |
| Line 87: | Line 99: |
| -w HELIX_WIDTH, --helix-width=HELIX_WIDTH: Helix width in pixels. Overrides the width in coordinates file. | -w HELIX_WIDTH, --helix-width=HELIX_WIDTH:: Helix width in pixels. Overrides the width in coordinates file. |
| Line 91: | Line 103: |
| e2helixboxer.py --db-add-hcoords=coordinates.txt --helix-width=210 micrograph_03.hdf e2helixboxer.py --db-set-hcoords=newcoordinates.txt -w 200 |
$ e2helixboxer.py --db-add-hcoords=coordinates.txt --helix-width=210 micrograph_03.hdf $ e2helixboxer.py --db-set-hcoords=newcoordinates.txt -w 200 |
| Line 97: | Line 109: |
| -X HELIX_COORDS, --helix-coords=HELIX_COORDS | If you want to work with the helices in programs not included with EMAN2, you may want to save the helix coordinates or helix image data. |
| Line 99: | Line 111: |
| . Save coordinates for helices in EMAN1 *.box format: . x1-w/2 y1-w/2 w w -1 . x2-w/2 y2-w/2 w w -2 -x HELIX_IMAGES, --helix-images=HELIX_IMAGES . Save images of the helices. The file name specified will have helix numbers added to it. -w HELIX_WIDTH, --helix-width=HELIX_WIDTH . Helix width in pixels Example: |
-X HELIX_COORDS, --helix-coords=HELIX_COORDS:: Save coordinates for helices to the file specified, which will have the EMAN1 *.box format. |
| Line 114: | Line 113: |
| e2helixboxer.py --helix-coords=hcoords.txt --helix-images=bdb:helix_images -w 215 e2helixboxer.py -X hcoords.txt -x helix.hdf --helix-width=210 |
x1-w/2 y1-w/2 w w -1 x2-w/2 y2-w/2 w w -2 ... |
| Line 118: | Line 118: |
| -x HELIX_IMAGES, --helix-images=HELIX_IMAGES:: Save images of the helices. The file name specified will have helix numbers added to it. -w HELIX_WIDTH, --helix-width=HELIX_WIDTH:: Helix width in pixels Examples: {{{ $ e2helixboxer.py --helix-coords=hcoords.txt --helix-images=micrograph2_helices.hdf -w 215 micrograph2.mrc $ e2helixboxer.py -X hcoords.txt -x helix.hdf --helix-width=210 micrograph.mrc }}} |
|
| Line 120: | Line 129: |
| Once helices have been boxed using the e2helixboxer.py GUI, or boxed with another program and the coordinates imported, the next step is to save particle data. This can be done with the "Save" dialog in the GUI or with command-line options. See the GUI documentation above for how particles are generated and what the parameters mean. Particle coordinates can be saved to a special text file, but usually, you will save particle image stacks, which will be used to create class averages. | |
| Line 121: | Line 131: |
| -P PTCL_COORDS, --ptcl-coords=PTCL_COORDS | ==== Particle Output Files ==== |
| Line 123: | Line 133: |
| . Save coordinates of the centers of particles with the specified overlap in pixels | -P PTCL_COORDS, --ptcl-coords=PTCL_COORDS:: Save coordinates of the centers of particles to the specified formatted text file |
| Line 125: | Line 135: |
| -p PTCL_IMAGES, --ptcl-images=PTCL_IMAGES | -p PTCL_IMAGES, --ptcl-images=PTCL_IMAGES:: Save images of the particles. The file name specified will have helix numbers (and particle numbers if the file type does not support image stacks) added to it. |
| Line 127: | Line 137: |
| . Save images of the particles with the specified overlap in pixels. The file name specified will have helix numbers (and particle numbers if the file type does not support image stacks) added to it. | ==== Particle generation parameters ==== |
| Line 129: | Line 139: |
| --ptcl-overlap=PTCL_OVERLAP:: Particle overlap in pixels | |
| Line 130: | Line 141: |
| --ptcl-overlap=PTCL_OVERLAP | --ptcl-length=PTCL_LENGTH:: Particle length in pixels |
| Line 132: | Line 143: |
| . Particle overlap in pixels | --ptcl-width=PTCL_WIDTH:: Particle width in pixels |
| Line 134: | Line 145: |
| --ptcl-length=PTCL_LENGTH | --ptcl-not-rotated:: Particles are oriented as on the micrograph. They are square with length max(ptcl_length, ptcl_width). |
| Line 136: | Line 147: |
| . Particle length in pixels | --ptcl-norm-edge-mean:: Apply the normalize.edgemean processor to each particle. |
| Line 138: | Line 149: |
| --ptcl-width=PTCL_WIDTH | --gridding:: Use a gridding method for rotation operations on particles. Requires particles to be square. ==== Particle Saving Examples ==== |
| Line 140: | Line 153: |
| . Particle width in pixels | * Saving rotated particles. {{{ $ e2helixboxer.py --ptcl-images=micrograph32_particles.hdf --ptcl-length=100 --ptcl-overlap=90 micrograph32.mrc $ e2helixboxer.py --gridding -p micrograph32_particles --ptcl-length=120 --ptcl-width=120 --ptcl-overlap=90 micrograph32.mrc }}} If some or all of the parameters, --ptcl-length, --ptcl-width, --ptcl-overlap are not specified, default values are chosen in this order. 1. If particle width is not specified, it is set to be the same as helix width. 2. If particle length is not specified, it is set to be the same as particle width. 3. If particle overlap is not specified, it is set to be 90% of particle length. Note that if the --gridding option is chosen, particles must be square. |
| Line 142: | Line 164: |
| --ptcl-not-rotated Particles are oriented as on micrograph. They are . square with length max(ptcl_length, ptcl_width). --ptcl-norm-edge-mean . Apply the normalize.edgemean processor to each particle. |
* Saving unrotated particles (to be rotated later with other software) {{{ $ e2helixboxer.py --ptcl-not-rotated --ptcl-image=micrograph32_particles.hdf --ptcl-width=100 --ptcl-overlap=90 micrograph32.mrc }}} Unrotated particles are always square. 1. If particle length and width are specified, the sides of the particles are set to the maximum of the two. 2. If neither particle length nor particle width are specified, the sides of the particle are set to the width of the helix. 3. If one of particle length and particle width are specified, the sides of the particles are set to that value. |
e2helixboxer.py: Overview
e2helixboxer.py is used to select rectangular 2D projections of helices from a micrograph, and extract overlapping particles from the boxed helices. The boxing must be done in GUI mode, but extracting particles from boxed regions may be done from the GUI or from the command line.

GUI mode
To start the program's graphic user interface, use the "--gui" option. You can follow this with a micrograph filename, a list of micrograph filenames, or nothing.
$ e2helixboxer.py --gui <micrograph1> <micrograph2> <...>
$ e2helixboxer.py --gui
$ e2helixboxer.py --gui 101.mrc
$ e2helixboxer.py --gui *.mrc micrograph.hdf *.img abc.dm3
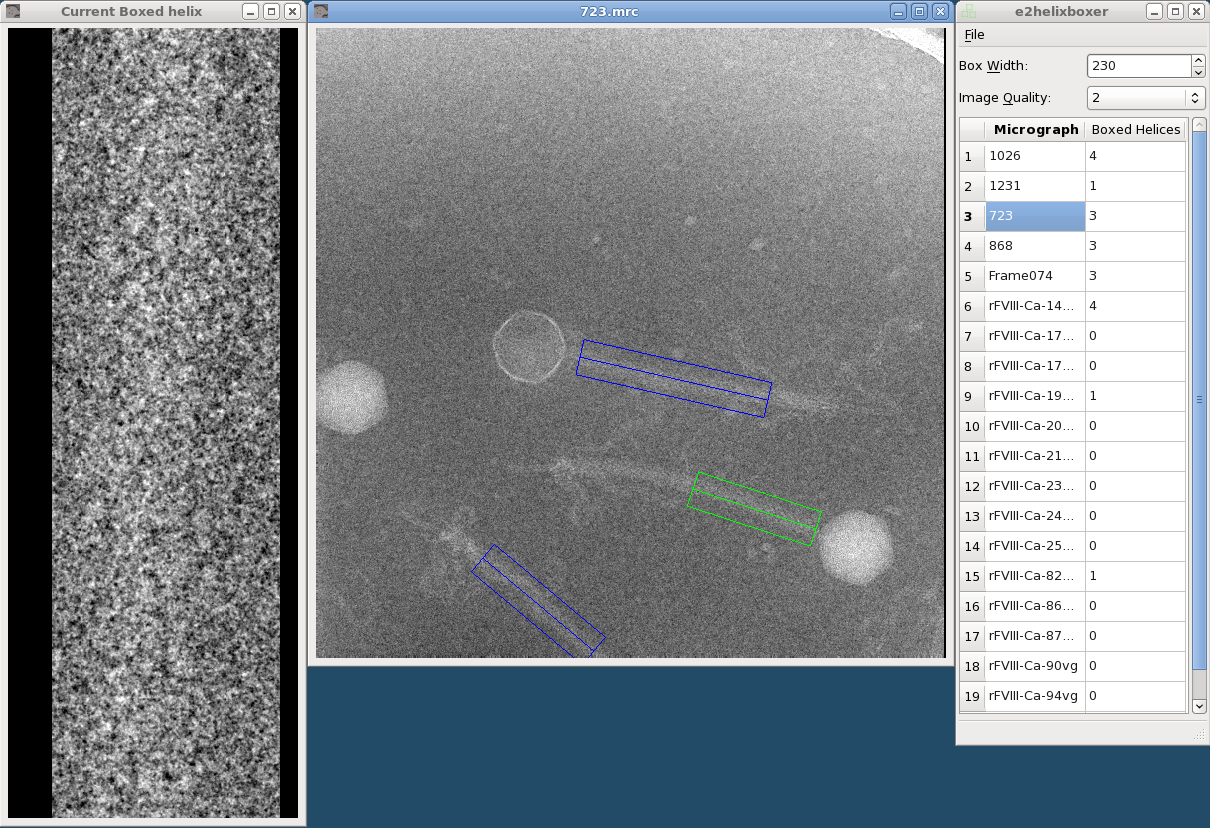
The left window is the helix viewer, the middle is the micrograph viewer, and the right is the main window.

The main window shows a list of open micrographs and how many helices you have boxed in each one. (Actually, only one micrograph is loaded in memory at a time, but this allows for quick switching between micrographs.) Any micrographs you specified after the "--gui" option will be listed.
Box Editing |
|
Draw box |
Left click and drag |
Move box |
Left click near box center and drag |
Move one box endpoint |
Left click near box end and drag |
Delete box |
Hold shift and left click inside box |
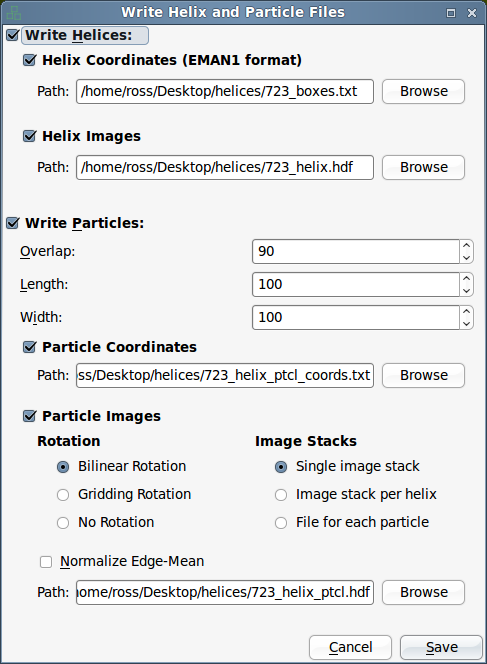
After you have boxed the helices in a micrograph, you can go to "File->Save" to save the coordinates and image data of the helices and the particles you extract from them.

A. Write Helices checkbox:
- Helices are the rectangles that you boxed. You can save their
- Coordinates to text file using the EMAN1 file format, but with a default *.txt file extension.
x1-w/2           y1-w/2           w           w           -1
x2-w/2           y2-w/2           w           w           -2
...
- where (x1, y1) and (x2, y2) are the coordinates on the micrograph for the helical axis endpoints, and w is the width of the helix boxes.
- Helix image data to image files
A. Write Particles checkbox:
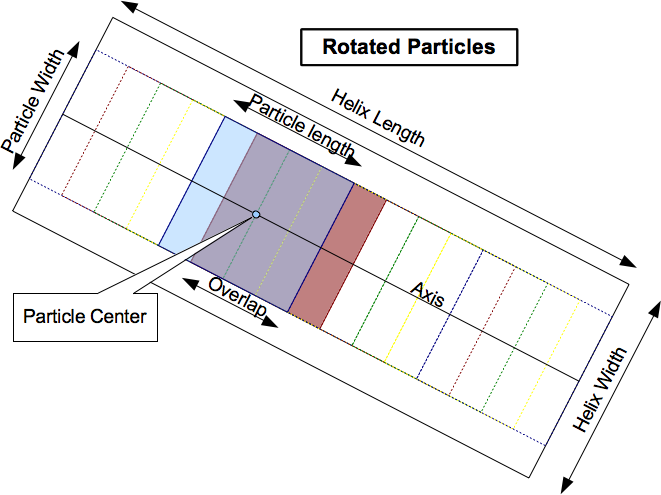
- Overlap: Distance in pixels that two adjacent particles overlap along the line connecting their centroids. Default: 90% of particle length
- Length: Distance between the centroids of two adjacent particles. Default: same as helix width
- Width: Width of particles in pixels. Default: same as helix width
- Write particle coordinates: For each helix, save the coordinates for the midpoint of each particle in that helix.
- Write Particle images: Save the image data for each particle in each helix. All the particles in a helix will go in a stack file if the file type supports stacks.
- Normalize edge-mean: Apply the "normalize.edgemean" processor to each particle before saving.
- Rotation:
- Bilinear: Use bilinear rotation (default)
- Gridding: Use gridding rotation. Forces particles to be square.
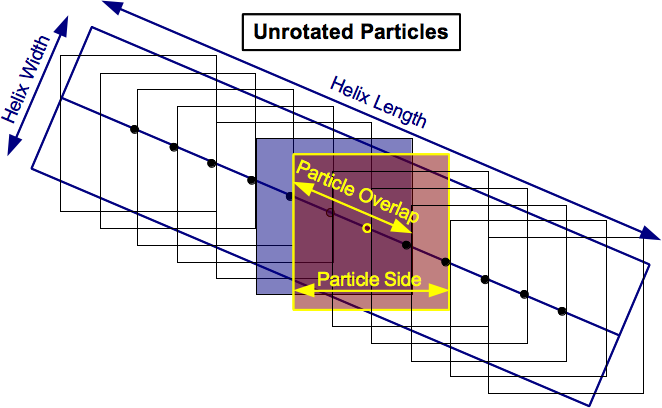
- No rotation: The particles are squares with horizontal and vertical sides. The length of a side of the square will be the maximum of the chosen particle width and particle height. The distance between the centroids of two adjacent particles will still equal the particle length, and the overlap will be measured along that line joining their midpoints.
- Image Stacks
- Single Image Stack: Stores all particles from the micrograph in a single image stack. Places the particles for an individual helix next to each other in the stack.
- Image stack per helix: For each helix in the micrograph, stores all particles in a stack. Helix numbers are inserted into the file names.
- File for each particle: Each particle is saved in its own image file. Helix numbers and particle numbers are inserted into file names.


Command-line mode
In command-line mode, you can only work with one micrograph at a time. Before using it, helices must be boxed in the GUI mode or imported from a formatted text file. In either case, the helix-box coordinates will be saved in the EMAN2 database.
Note: As in the EMAN2 convention, data is saved automatically in a database in the current working directory as you use the program. To access this data again, start programs in this same directory the next time.
$ e2helixboxer.py <options (not --gui)> <micrograph>
Importing Helix Coordinates
If you have coordinates for the helices that are not saved in the EMAN2 embedded database, perhaps because you did the boxing in another program, you must first import them to the embedded database before you can use e2helixboxer to generate particle sets.
- --db-add-hcoords=DB_ADD_HCOORDS
- Adds helix coordinates to the database from the specified file (in EMAN1 *.box format)
x1-w/2           y1-w/2           w           w           -1
x2-w/2           y2-w/2           w           w           -2
...
- --db-set-hcoords=DB_SET_HCOORDS
- Replaces the helix coordinates in the database with the coordinates from the specified file (in EMAN1 *.box format)
- -w HELIX_WIDTH, --helix-width=HELIX_WIDTH
- Helix width in pixels. Overrides the width in coordinates file.
Examples:
$ e2helixboxer.py --db-add-hcoords=coordinates.txt --helix-width=210 micrograph_03.hdf
$ e2helixboxer.py --db-set-hcoords=newcoordinates.txt -w 200
Exporting Helix Data
If you want to work with the helices in programs not included with EMAN2, you may want to save the helix coordinates or helix image data.
- -X HELIX_COORDS, --helix-coords=HELIX_COORDS
- Save coordinates for helices to the file specified, which will have the EMAN1 *.box format.
x1-w/2           y1-w/2           w           w           -1
x2-w/2           y2-w/2           w           w           -2
...
- -x HELIX_IMAGES, --helix-images=HELIX_IMAGES
- Save images of the helices. The file name specified will have helix numbers added to it.
- -w HELIX_WIDTH, --helix-width=HELIX_WIDTH
- Helix width in pixels
Examples:
$ e2helixboxer.py --helix-coords=hcoords.txt --helix-images=micrograph2_helices.hdf -w 215 micrograph2.mrc
$ e2helixboxer.py -X hcoords.txt -x helix.hdf --helix-width=210 micrograph.mrc
Exporting Particle Data
Once helices have been boxed using the e2helixboxer.py GUI, or boxed with another program and the coordinates imported, the next step is to save particle data. This can be done with the "Save" dialog in the GUI or with command-line options. See the GUI documentation above for how particles are generated and what the parameters mean. Particle coordinates can be saved to a special text file, but usually, you will save particle image stacks, which will be used to create class averages.
Particle Output Files
- -P PTCL_COORDS, --ptcl-coords=PTCL_COORDS
- Save coordinates of the centers of particles to the specified formatted text file
- -p PTCL_IMAGES, --ptcl-images=PTCL_IMAGES
- Save images of the particles. The file name specified will have helix numbers (and particle numbers if the file type does not support image stacks) added to it.
Particle generation parameters
- --ptcl-overlap=PTCL_OVERLAP
- Particle overlap in pixels
- --ptcl-length=PTCL_LENGTH
- Particle length in pixels
- --ptcl-width=PTCL_WIDTH
- Particle width in pixels
- --ptcl-not-rotated
- Particles are oriented as on the micrograph. They are square with length max(ptcl_length, ptcl_width).
- --ptcl-norm-edge-mean
- Apply the normalize.edgemean processor to each particle.
- --gridding
- Use a gridding method for rotation operations on particles. Requires particles to be square.
Particle Saving Examples
- Saving rotated particles.
$ e2helixboxer.py --ptcl-images=micrograph32_particles.hdf --ptcl-length=100 --ptcl-overlap=90 micrograph32.mrc
$ e2helixboxer.py --gridding -p micrograph32_particles --ptcl-length=120 --ptcl-width=120 --ptcl-overlap=90 micrograph32.mrc
If some or all of the parameters, --ptcl-length, --ptcl-width, --ptcl-overlap are not specified, default values are chosen in this order.
- If particle width is not specified, it is set to be the same as helix width.
- If particle length is not specified, it is set to be the same as particle width.
- If particle overlap is not specified, it is set to be 90% of particle length.
Note that if the --gridding option is chosen, particles must be square.
- Saving unrotated particles (to be rotated later with other software)
$ e2helixboxer.py --ptcl-not-rotated --ptcl-image=micrograph32_particles.hdf --ptcl-width=100 --ptcl-overlap=90 micrograph32.mrc
Unrotated particles are always square.
- If particle length and width are specified, the sides of the particles are set to the maximum of the two.
- If neither particle length nor particle width are specified, the sides of the particle are set to the width of the helix.
- If one of particle length and particle width are specified, the sides of the particles are set to that value.
