e2filtertool
This program allows you to interactively construct sequences of processors and apply them to both 2-D and 3-D data. For example, if you need to determine the best parameters for automasking a 3-D volume, or if you wish to play with low-pass filtering your data with different options, this program provides an easy interface.
There is a short video tutorial available for this program.
Options:
No options. Provide the name of an image file to process. |
Description
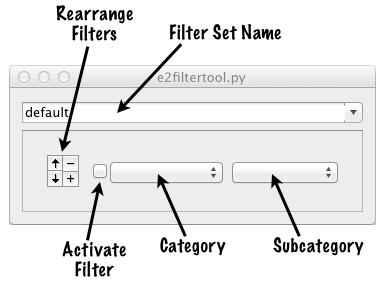
When you open the program for the first time you will see two windows appear. One will contain the image you specified on the command-line. The other will look like this :

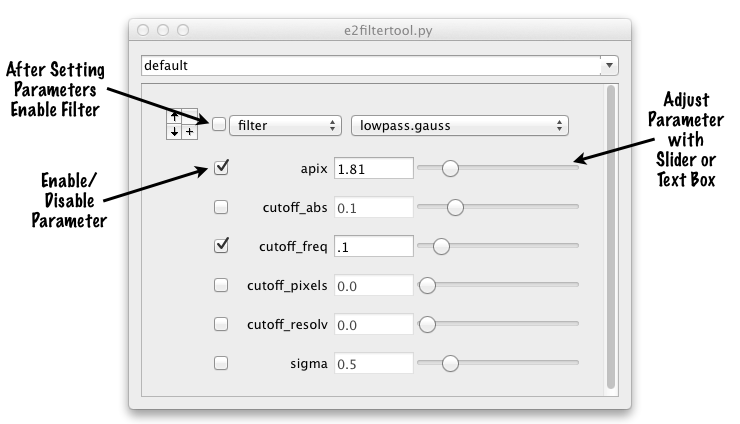
To define the first filter/processor in a chain, select a category, then a subcategory from the pop-up menus. For example:

In the example shown above, you will see that all of the available parameters for the 'filter.lowpass.gauss' filter are listed. The checkbox next to each defines whether that parameter is used or not. This is an important point because in some cases the same information can be specified in different ways. In this example. cutoff_abs, freq, pixels and resolv, as well as sigma, all refer to the same property of the filter. That is, how much low pass filtration to apply. You only want to specify one of these options at a time. If you specify more than one, the behavior is undefined (it will use one of the values you specify, but you don't know which). Mousing over one of the parameter names will bring up a pop-up explaining what that parameter means. Detailed help on all available processors can be obtained with 'e2help.py processors -v 2'
Like all other EMAN2 programs with a text-box/slider combination, you can adjust the range of the slider by entering '<number' or '>number' in the text box.
Do not enable the filter (checkbox next to the filter name) until valid parameters have been entered. If the filter is enabled, and it doesn't have the necessary parameters, it will trigger an error.
Pressing the small '+' button will create a second filter below the first. Like the first filter, it will begin disabled. The filters created in this way will be executed in sequence. The image window will show the final result after the last filter has been applied. The ordering of the filters can be rearranged with the up and down arrows.
While the process is interactive, some filters may be very slow to operate (for example, a low-pass filter applied to 512^3 volume). In such cases it's a good idea to adjust the parameter values using the text box rather than the slider for better responsiveness.
If you are running filtertool on a stack of particle images, and wish to save the entire stack processed with the filters you've defined, the File menu has a "Save Processed Stack" option for this purpose. It will apply the defined processors to the entire stack, not just the few images shown in the preview window.
Multiple filter-sets are supported. Once a filter set has been defined, simply enter a new name in the box where 'default' is displayed. Whatever filter set you have established under the 'defualt' name is the one that will be automatically loaded when the program starts.
The parameters for the filters are stored in human readable text-files called 'filtertool_<name>.txt' in the local directory. If you wish to copy a particular filter set from one project to another, simply copy this text file to the directory where you want to run e2filtertool.py, and it will appear in the list of available filter sets. These text files look like this:
# This file contains the parameters for the processor set named
# default
# Each of the --process lines below is in the correct syntax for use with e2proc2d.py or e2proc3d.py.
# Use the full set sequentially in a single command to replicate the processor set

#$ disabled
# cutoff_abs=0.1:cutoff_pixels=0.0:cutoff_resolv=0.0:sigma=0.5
--process=filter.lowpass.gauss:apix=1.81:cutoff_freq=0.1
It can be very useful to copy the options from this file. The '--process' line shown above is the exact syntax required to reproduce that filter in e2proc2d.py or e2proc3d.py. A filter set with several filters will appear as multiple '--process' lines in the filtertool_default.txt file. If you add these options in sequence to an e2proc2d/3d command, you can replicate the exact results observed in e2filtertool.py.
For example:
e2proc2d.py mystack.hdf filtered.hdf --process=filter.lowpass.gauss:apix=1.81:cutoff_freq=0.1
Here is another 3D example:
# This file contains the parameters for the processor set named
# monosym
# Each of the --process lines below is in the correct syntax for use with e2proc2d.py or e2proc3d.py.
# Use the full set sequentially in a single command to replicate the processor set

#$ enabled
#
--process=normalize.edgemean

#$ enabled
# cx=0.0:cy=0.0
--process=mask.cylinder:inner_radius=84:outer_radius=300:phicen=-20.0:phirange=20.0:phitriangle=True:phitrirange=5.0:zmax=512.0:zmin=0.0

#$ enabled
#
--process=xform.applysym:averager=mean:sym=c8
which becomes:
e2proc3d.py myvolume.hdf filtered.hdf --process=normalize.edgemean --process=mask.cylinder:inner_radius=84:outer_radius=300:phicen=-20.0:phirange=20.0:phitriangle=True:phitrirange=5.0:zmax=512.0:zmin=0.0 --process=xform.applysym:averager=mean:sym=c8
